-
Charges & Policies
-
Shariah Compliant Dropshipping in Pakistan
-
HHC Portal Basic Training
-
- How to work with HHC Dropshipping step by step?
- What is a business profile in HHC & how can I set it up?
- Does HHC dispatch parcels with Our (Dropshipper's) information on the Shipping Label?
- If I provide you with my courier account's CN# and slip with advance payment, will you pack the product and give it to that company?
- How to Mention Special Instruction for Courier Rider on HHC Dropshipping?
- How to use the “Allow to Open” Service with HHC Dropshipping?
- My HHC account is on a trial period of 30 days, what does it mean?
- What are Notifications and where can I find notifications on HHC Dropshipping?
- Where to Find Suppliers on HHC Dropshipping?
- What is News Feed & How does it work?
- How to Contact HHC Support (Complete Guide)
- HHC Dropshipping Does Not Allow Daraz or Public Marketplace Integration
- Step-by-Step Registration Process for HHC Dropshipping Account
-
- How can I cancel order on HHC Dropshipping?
- Why tracking your order is important?
- Where can i find Courier Tracking IDs?
- My order is On Hold & has not been dispatched yet. What should i do?
- How can I reattempt orders & what is RCP? OR What is Shipper Advice?
- How can i directly submit a Shipment Reattempt Request without launching support ticket?
- What should I do if my order is delivered but is not updated on HHC or the Wrong status has been updated on my order?
- Where can I find CSV & How to import CSV?
- How Can I Filter Products via City Name?
-
- What is Stock Confirmation, How to Do It, and Why is It Important?
- How Can I Know About Product Quality on HHC Dropshipping & How SDR and PDR Effect Product Quality?
- If a high-priced product on HHC is available at a lower price in the market, how can we communicate with the supplier or team about this?
- Where can I ask if I have any questions related to a product?
-
-
HHC Portal Advance Training
-
- HHC Dropshipping & Courier Shipment Status Guide
- Bulk Product Uploading Using CSV File
- Whatsapp Message Feature! Use and Setting Explained
- Import Bulk Orders Through CSV File - HHC Dropshipping Bulk Order Import Feature
- Manage & Control Order Delivery Related Issues Using Transit Report
- Improved PDR Ratings & Problematic Products Report
- HHC & Courier Tracking Statuses Guide
-
-
Profit Maintainability
-
HHC Digital Marketing & ecommerce Masterclass
-
- CH2 - EP01 - Hosting and Domain - Website Development
- CH2 - EP02 - WordPress vs Shopify - Website Development
- CH2 - EP03- Installing WordPress from cPanel -WordPress Development
- CH2 - EP04 - SSL & WooCommerce - WordPress Development
- CH2 - EP05- Variable Products-Homepage-Theme Selection - WordPress Development
- CH2 - EP06 - Theme Installation - Wordpress Development
- CH2 - EP07 - Theme Setup-Required Plugins-Demo Import - Wordpress Development
- CH2 - EP08-Theme Setup - Header-Menu-Logo - WordPress Development
- CH2 - EP09-Store Setup - Homepage & Contact Page Design - WordPress Development
- CH2 - EP10-Bulk Product Upload Using CSV File - WordPress Development
- CH2 - EP11- Generating Privacy Policy and Return Policy - WordPress Development
- CH2 - EP12- Footer Designing & Generating About Us Content Using Chat GPT - WordPress Development
- CH2 - EP13- Chat Button & Banners Designing - Error Resolving Approach - WordPress Development
- CH2 - EP14- Slider Revolution and Product Grids - WordPress Development
- CH2 - EP15- Setting Checkout Form and Delivery Charges - WordPress Development
- CH2 - EP16 - Adding Coupons & Discounts - WordPress Development
- CH2 - EP17 - Setting up Mobile Version of the Website - WordPress Development
- CH2 - EP18 - Summarizing WordPress Development and Other Niche Websites - WordPress Development
-
- CH3 - EP01- Setting up Social Media Existence - Digital Marketing Practical
- CH3 - EP02 - Meta Business Manager-Ad Account-Pixel Setup - Digital Marketing Practical
- CH3 - EP03 Part-1- Product Hunting for Dropshipping Model - Digital Marketing Practical
- CH3 - EP04 - Conversion Rate Optimization - Digital Marketing Practical
- CH3 - EP05 - Content Scrapping and Product Uploading - Digital Marketing Practical
- CH3 - EP06 - Launching First Facebook Marketing Campaign - Digital Marketing Practical
- CH3 - EP07 - Ad Performance Evaluation - Digital Marketing Practical
- CH3 - EP08 - Call Confirmations & Order Fulfilment - Digital Marketing Practical
- CH3 - EP09 - Google Analytics Integration - Digital Marketing Practical
- CH3 - EP10 - Advance Features and Facebook Ads Scaling - Digital Marketing Practical
- CH3 - EP11 - Facebook Leads Ads - Digital Marketing Practical
-
- CH4 - EP01 - TikTok Ads Overview - Digital Marketing Advance Concepts
- CH4 - EP02 - Understanding Facebook Algorithm - Digital Marketing Advance Concepts
- CH4 - EP03-Email & Influencer Marketing-Organic Activities-Google My Business - DM Advance Concept
- CH4 - EP04- Search Engine Optimization - Digital Marketing Advance Concepts
- CH4 - EP05- Extremely Advance Digital Marketing Strategies - Digital Marketing Advance Concepts
-
Delivery Time & Delivery Ratio Course
-
All Delivery Time/Ratio Trainings
How to use the “Allow to Open” Service with HHC Dropshipping?
HHC currently offers the “Allow to Open” service exclusively through Trax Courier. Follow these steps to enable this service for your orders:
1. Log in to Your Account:
– Access your HHC Dropshipping account using your credentials.
2. Place Your Order:
– Add the desired product to your cart.
– Proceed to the checkout page.
3. Select Trax Courier:
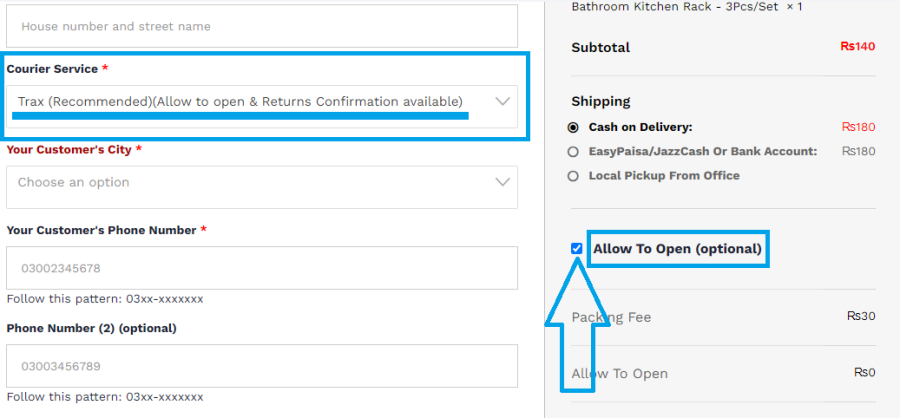
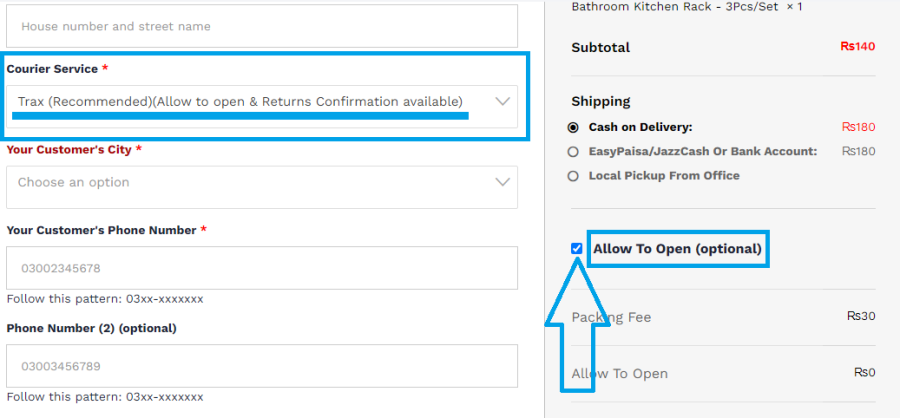
– In the checkout form, find the “Courier Service” field.
– Select “Trax Courier” from the dropdown menu.
4. Enable “Allow to Open”:
– In the “Order Cost” section, look for the “Shipping Charges” area.
– Below the “Shipping Charges,” you will see a checkbox labeled “Allow to Open.”
– Tick the “Allow to Open” checkbox.
Figure:

5. Complete the Order:
– Enter all the required information in the checkout form.
– Review your details and submit the order.
6. Confirmation and Shipping Label:
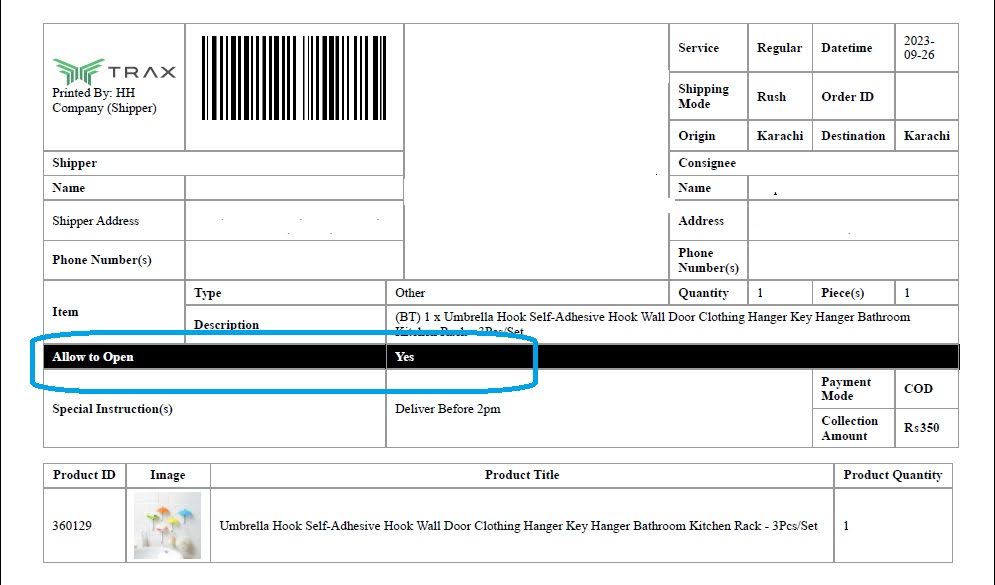
– After submitting your order, the “Allow to Open” option will be automatically printed on the shipping label attached to the parcel.
– When the customer receives the parcel, the courier rider will see the “Allow to Open” instruction on the shipping label and will allow the customer to open and check the parcel in their presence.
Visual Guide:
Checkout Form Highlight:
– In the screenshot below, the “Courier Service” and “Allow to Open” fields are highlighted for your reference.

Shipping Label Highlight:
– The shipping label will automatically include the “Allow to Open” instruction. Below is an example of the shipping label with the “Allow to Open” field highlighted.

By following these steps, you can ensure that your customers have the option to open and inspect their parcels upon delivery, providing them with added confidence and satisfaction.